FREQUENTLY ASKED QUESTIONS
FREQUENTLY ASKED QUESTIONS
WARRANTY & REPAIR
What is the warranty period?
5 years minimum. Please note that with warranty repairs you will be responsible for return shipping which will be quoted when you contact me about the repair. Can the DewBuster™ Controller be repaired if it breaks after the warranty?
As long as the circuit board has not been severely damaged from external sources (fire, flood, rain, lightning, etc.) then all DewBuster™ Controllers are repairable. How much to repair a DewBuster™ Controller after the warranty expires?
NON-WARRANTY repairs are done at a flat rate repair fee which is currently $50 plus return shipping. Contact me before sending your DewBuster™ Controller in for repair. I will provide advice on how to check that it is really faulty (the problem is often a bad connection or the battery or power supply). I purchased my DewBuster™ Controller used, does the warranty transfer?
No, but it can be repaired at the NON-WARRANTY flat rate repair fee described above. Will my warranty be voided by modifying my DewBuster™ Controller's power cord or case?
Unlike competitors, I do not look for reasons to void your warranty. DO NOT make any modifications to the circuit board, but feel free to modify the power cord or remove the back cover to drill holes for mounting screws (make sure nothing touches the circuit board). And if your modifications cause any damaged you will only be charged for the components damaged by the modification, any other repairs will be covered under warranty. If you contact me I can usually provide you with helpful advice to aid in your success. GENERAL QUESTIONS
What else will I need besides the DewBuster™ Controller?
The DewBuster™ Controller will require heating strips and a power source. The heating strips are purchased to fit the telescope and are plugged into the DewBuster™ Controller's heater output jacks. Typically heaters are used on the main lens (refractor) or corrector plate (Schmidt-Cassegrain). Newtonian Reflectors do not need a heater on the primary mirror but do need a heater on the secondary mirror. Heaters are also needed for the other optics such as eyepiece, finderscope, and Telrad. The DewBuster™ Controller is powered by a 12VDC power source and a variety of connectors are available to fit many power sources. If you wish to operate your DewBuster™ Controller from a 120 VAC electrical outlet you can use a 13.8VDC power supply but for your safety you should power it via a ground fault interrupt (GFI) protected power outlet. Why a DewBuster™ Controller if cheap ones will prevent dew?
Preventing dew is only part of the goal. You bought excellent optics to see sharp highly magnified images of objects in the night sky, yet blindly applying heat to your main lens blurs those images and you'll think its just "poor seeing" conditions. Humans have difficulty sensing temperature so you can't rely on "feel" to adjust your dew heaters, if it feels warm then it is too hot. The only way to be sure we are not heating the main lens any more than absolutely necessary is to accurately measure the temperature and constantly fine tune the power going to the heater strip so that the telescope is kept just a little warmer than the air temperature. The DewBuster™ Controller does that automatically leaving you free to enjoy your telescope. And a side benefit is that it saves battery energy by not applying un-necessary heat. Why does dew form at night?
During the day the sun warms the air and it absorbs any moisture it comes into contact with. But at night the air temperature drops and it can't hold all the moisture so it forms dew. Objects which radiate heat will cool faster than the air and then cool the air near near them below the dew point so dew will form on that object first. Objects which radiate heat will cool faster than the air and dew up first.Why does dew form on my lens or corrector plate?
As described above, dew can form on any object which gets colder than the air temperature. Since the corrector plate is thin, it does not have much mass to store heat and since it is exposed to the night sky it quickly radiates that heat and cools below the air temperature. A dew shield will reduce the area of sky that is robbing heat from the corrector plate, but it will eventually cool below the air temperature and if the air is near the dew point temperature then dew will quickly form. How can my telescope get colder than the air temperature?
When you first bring a warm telescope outside, the air around it immediately starts cooling it off because heat travels from warm objects (scope) to colder objects (air). The greater the temperature difference the faster it cools, so it may cool 3/4 of the way in the first 5 minutes, but take half an hour to cool the rest of the way. After that, radiant cooling by the night sky (cold object) will continue cooling the telescope (warm object) until a balance is reached where the air (warmer than scope) gives up heat to the telescope to replace what is being lost through radiant cooling by the night sky. The telescope tube will also drain heat away from the corrector plate and radiate it to space. A balance is point is reached with the telescope a few degrees cooler than the air temperature. The balance point is affected by wind (helps warm scope) and sky transparency (increases radiant heat loss). Why not set the DewBuster™ Controller based upon the dew point?
Regardless of how low the dew point may get, your telescope performs best with the optics at the same temperature as the air around it. For this reason the minimum setting of the DewBuster™ Controller is zero degrees (telescope at same temperature as the outside air) so that the telescope will not get colder than the air. For humid conditions the temperature control knob can be set higher to maintain the telescope warmer than the outside air temperature. This is needed because some heat loss occurs between the telescope tube where the heater strip is located and the corrector plate. So unless the telescope tube is kept warmer than the air temperature, the corrector plate may fall below the air temperature. Doesn't it waste power warming the corrector when the dew point is well below the air temperature?
A DewBuster™ Controller set a few degrees above 0 only applies a small amount of energy to keep the telescope tube at the air temperature, much less than the lowest setting of most controllers. The small amount of energy used is well worth it to keep the corrector from cooling below the air temperature and risking dew formation. In addition, keeping the telescope near ambient air temperature provides much better performance than waiting for the dew point to be reached and then applying large amounts of heat to warm it up. Also, it is not worth the risk of allowing dew to form because it takes much more energy to dry it up than to prevent it from forming in the first place. Will the DewBuster™ Controller work with non-metal tubes or lens mounts?
Carbon fiber tubes conduct heat well enough to use the DewBuster™ Controller in the normal fashion (heater just behind corrector casting). Some economy refractors and finderscopes have plastic lens mounts which do not conduct heat but the heater strip can be placed around the metal tube so that it warms the air within the tube which will in turn warm the lens. What temperature should the DewBuster™ Controller be set at for my telescope?
Every situation is different so 5°F is a good starting point for most scopes (10°F for 12 inch and larger SCT's) and if no dew forms try a slightly lower setting each night until you find the lowest temperature that never allows dew to form. While the lowest setting will allow the telescope to perform best, if 5 works all the time but 4 works some of the time then just set it to 5 at the beginning of the night and you'll never have to worry about dew. And do not set it lower and increase it when you think dew will form, keeping the same setting throughout the night will help the telescope reach thermal equilibrium and perform better. How can the DewBuster™ Controller apply heat without causing tube currents?
See Telescope Cooldown for a full explanation. Where would be a good place to mount the DewBuster™ Controller?
One popular location on all SCT's is on the optical tube assembly. The advantage is that the heater wires don't have to flex as the scope moves, so the only cord you have to worry about is the DC power cord. The power cord is 8 feet long to allow flexibility in routing. On fork mounted SCT's a popular choice is to mount the DewBuster™ Controller on the fork arm. If you chose this location, run the heater cables through Split Loom Tubing to keep them organized and out of the way of the moving parts of the telescope. HEATERS & TEMPERATURE SENSORS
Can I purchase heater strips on this web site?
I do not sell heaters because I prefer to concentrate on building the best controller available. Heater strips are mass produced items and there are many excellent commercial heaters available. You may also build your own heater strips following my instructions. What heaters will I need?
An SCT or refractor will need a heater on the telescope tube (not the dewshield) to warm the corrector plate or objective lens (place heater around main tube just behind the corrector plate casting or lens cell). On a Newtonian you WILL NOT need a heater on the primary mirror (a fan blowing on back of primary mirror should prevent dew) but you will need a heater on the secondary mirror. On all telescopes you will need a heater for your eyepiece but you only need to buy the largest size, a 2" heater will fit a 1.25" eyepiece and the excess will not cause a problem. For SCT's and Refractors you can just put the heater strip on your star diagonal (a 2" heater typically fits a 1.25" diagonal, a 3" heater on a 2" diagonal) and the star diagonal will warm the eyepiece by conduction (makes changing eyepieces much easier). In a similar fashion, if you have a Dob with a Paracorr you can put a heater on it to warm the eyepiece. You will also need heaters for your finderscope objective and eyepiece (usually 0.965") but if you only use it for the initial star alignment you can just keep it capped. If you have a any other finder devices (Telrad, Rigel, etc.) you may also need a heater for those as well. Do I still need a dew shield with electric heaters?
A dew heater is a supplement to a dew shield, not a replacement. A dew shield helps reduce heat loss to the night sky and can also block stray light to help improve image contrast. To be effective, the dew shield should extend at least one lens diameter in front of the lens and longer is better. Most refractors are already equipped with a dew shield, but if that dew shield does not extend at least one lens diameter past the objective then an extension is recommended. A dew shield does not have to be expensive, some of the best are home made. When a DewBuster™ Controller is being used in combination with a dew shield, the reduced heat loss will allow a lower setting of the controller without dew forming. This not only saves precious battery power, but also improves optical performance. Many dew shields also act as insulators and when fitted over the dew heater can improve heat transfer into the telescope and reduce power consumption. Where is the best location for the heater strip on a Refractor?
The most common mistake is placing it on the Dew Shield which is ineffective because very little of the heat conducts to the lens. Most of the heat warms the air in front of the lens creating thermal air currents that ruin the telescopic images. In addition, radiation cooling by the night sky cools the telescope tube, the air inside, and the lens surface inside the tube. The correct location is around the telescope tube just behind the dew shield. Since the lens cell is mounted to the tube some of the heat will conduct to the lens and the rest of it prevents the tube from being cooled by the night sky and stealing heat from the lens surface inside the tube. The end result is that much less heat needs to be applied and it is applied from the inside so no thermal currents are created and the telescope performs at its best. See Telescope Cooldown for more information. 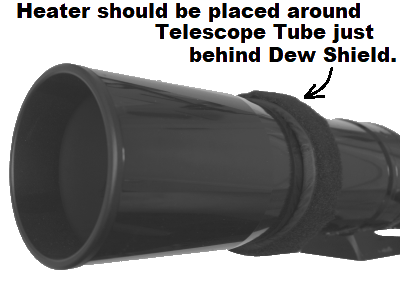
Where is the best location for the heater strip on an SCT?
Around the aluminum tube just behind the corrector plate casting as shown in the photo below. This warms the tube which transfers the heat to the air within it. By keeping the air inside the tube from getting cold, instead of robbing heat from the corrector plate it will warm the corrector plate. See Telescope Cooldown for more information. 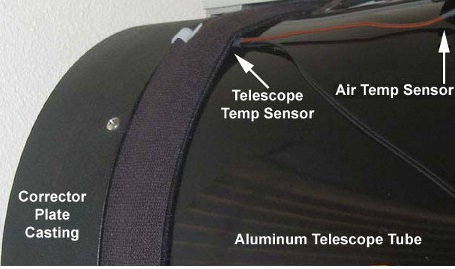
Why not place the heater around the corrector plate casting or inside the dew shield to warm the air where the dew forms?
The corrector plate glass is insulated from the casting with cork spacers so heat will not transfer from the metal to the glass. It is much more effective to warm the telescope tube because the heat energy travels into the telescope warming the air within which then warms the corrector plate from the inside and offsets heat loss to the night sky. See Telescope Cooldown for more information. My scope has rails that interfere with placing the heater strip just behind the Corrector Plate Casting, so where should I place the heater strip?
The Corrector Plate Casting has a larger outside diameter than the telescope tube so there is about a 1/16" gap between the tube and the rail or bar as shown in the upper portion of the diagram below. Try sliding the thinner Velcro end through the gap first and then work the heater strip through by sliding back and forth along the rail. To avoid wear on the fabric, just leave the heater in place rather than removing it after each observing session. If this is not successful, then it may be possible to put washers or spacers between the rail and the casting as shown in the lower portion of the diagram below to create a gap. Adding spacers or washers will most likely require longer screws than those supplied with the rail (short screws will not fully engage the threaded holes and will strip out). In general the screws must be longer by the same amount as the spacer or washer thickness you added (check the length by looking through the corrector plate while turning the focus knob and make sure the screws do not protrude into the scope so far that they hit the primary mirror as it moves back and forth). 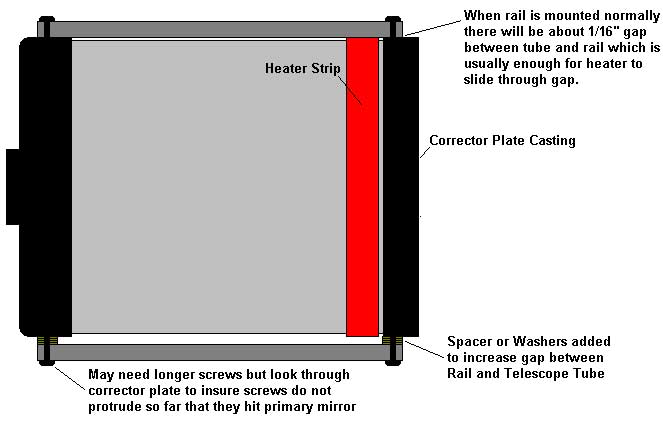
What is the Temperature Sensor for?
The Temperature Sensor (see photo above) measures both the ambient air temperature and the telescope temperature. The DewBuster™ Controller uses this information to constantly adjust the power output to the Temperature Controlled Heater in order to maintain the telescope slightly warmer than the air temperature. The control knob sets the exact number of degrees Fahrenheit that the telescope will be warmed above the air temperature. For easy attachment, the Scope Sensor clips onto the heater strip which holds it in place against the telescope tube. The Air Sensor is located on the end of the extension wire which keeps it suspended in air and away from the heater for an accurate air temperature reading. This is much better than having the air sensor inside the controller where heat from the electronic components would introduce errors. Since the two sensors are combined into one assembly with a single 6-foot cable, wiring clutter can be minimized by routing the sensor cable alongside the heater strip cable (you may tape them together if you wish). The cable length may be shortened by the end user or you may specify a shorter length when ordering. 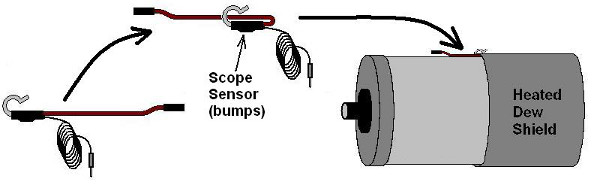
How do I attach the temperature sensor to a heated dew shield?
As shown above, the brown wire of the sensor should be bent into a U shape so that it will protrude out the back of the dew shield when the sensor is clipped onto the back edge of the heated dew shield. Insure that the Scope Sensor (two little bumps under the black heat shrink band on the clip) are able to make contact with the telescope tube. Can the DewBuster™ Controller be used with the new Celestron Ring Heater?
The ring heater's built-in thermistor is NOT compatible BUT I have developed a special Ring Heater Sensor that is easy to attach to the Ring Heater prior to installing it. I will soon be adding it to my order form, but it is now available to order. If you are interested contact me and I can provide additional information and add it to a DewBuster™ Controller or Accessory order. Can my controller be configured with more than two Temperature Sensor inputs?
No, but you rarely need more. Medium Power outputs are better suited for small heaters such as eyepiece, finderscope, and Telrad because they apply a little extra heat to prevent dew without needing a temperature sensor. Temperature Control is best used for items that affect optical performance such as the objective lens or corrector plate because they allow the heat to be reduced to the minimum that keeps it above the air temperature and prevents dew. These are also your largest heaters so reducing heat saves substantial energy making your battery last longer. When would I use 2 Temperature Controlled heater outputs for each Temperature Sensor?
Most users will only need one Temperature Controlled Output (the default configuration) but the extra Temperature Controlled jack may be used in special situations such as when using two heater strips on the main scope (sometimes useful on C-14's) or for binoculars (use the sensor on one objective and plug both objective heaters into that side). Should I buy or build my heaters?
If you enjoy building projects then making your own heaters can be fun and if you don't like the results all you've wasted is a little of your time. A few dollars worth of resistors will be enough to build heaters for every accessory you own. This not only saves you money, but once you see how easy it is to build heater strips you will probably build heaters for many things you would not have bought a heater for. One particular advantage of my instructions for building heaters is that they produce the same amount of heat for a given diameter as do commercial heaters. That means you can mix commercial and home made heaters on your telescope without worrying about one creating too much heat and the next being underpowered. It also means that you can build heaters for everything and if you like the commercial heaters better then you can replace them one or two at a time as your budget allows. One exception is the corrector plate heater, commercial heaters are usually thinner than home made heaters and thus easier to slip between the rail and telescope tube so many Schmidt-Cassegrain owners opt to buy the corrector plate heater and build the smaller heaters themselves. Should I put a heater on my Star Diagonal?
If your telescope is normally used with a Star Diagonal then I recommend putting a heater strip around the diagonal as shown below and then you will not need an eyepiece heater because the diagonal will conduct heat to the eyepiece. Since the diagonal is bigger around than an eyepiece, you will need to use a larger heater. A 1.25" diagonal will probably need a 2" heater and a 2" diagonal will probably need a 3" heater. Another advantage of placing the heater on the diagonal is that the heater does not need to be removed when changing eyepieces. This not only makes it easier, but you won't get dewed up because you forgot to put the heater back on. If you are building your own heaters, take a look at my home-made diagonal heater instructions 
How do I heat a Telrad since it has a plastic housing?
Heaters which fit the outside of the Telrad are not efficient or effective because the plastic sides of the Telrad do not conduct heat well. The best Telrad heaters apply heat directly to the glass like the Dew-Not Telrad heater. You may also wish to consider building your own Telrad heater (see Tips at bottom). Can I use an RCA "Y" splitter to plug 2 heaters into one RCA jack?
Most commercial RCA splitters and patch cords are "shielded" cables meaning they have tiny wires designed to block electrical noise. Unfortunately the SMALL WIRES CAN'T HANDLE MUCH CURRENT AND WILL GET HOT AND POSSIBLY MELT if used with dew heaters. If you need a splitter or extension it is best to make your own using #24AWG (small heaters) to #18AWG (larger heaters) wire. TELESCOPE PERFORMANCE & COOLDOWN
Is a dew shield important?
A dew heater is a supplement to a dew shield, not a replacement. A dew shield is an important part of any telescope, especially a Schmidt-Cassegrain. It not only reduces heat loss to the night sky, but also blocks stray light and improves image contrast. The dew shield should extend at least one lens diameter in front of the lens to be effective, but even a 1/2 diameter dew shield is better than none . Most refractors have built in dew shield but if it does not extend at least one lens diameter past the objective then an extension is recommended. A dew shield does not have to be expensive either, a home made Reflectix™ dew shield is easy to make yet very effective. Many dew shields have insulating qualities and when fitted over the dew heater can reduce heat loss so that more heat travels to the telescope where it is needed. What are tube currents and telescope cool down?
Your telescope is at "thermal equilibrium" while stored inside your home, meaning all parts are at the same temperature. When taken outside the parts release stored heat to "cool down" to the outside air temperature. Metal parts conduct heat well and cool rapidly, however glass does not so the optics cool down slowly and the center of the glass will be warmer than the outside surfaces resulting in temporary distortions of the optical components and imperfect images. Compounding the problem, the escaping heat warms air within the telescope tube causing air movements (tube currents) as warm air rises and cold air sinks. Illustrated below is a Schmidt-Cassegrain telescope undergoing "cool down". Tube currents within the OTA are shown (red for warm and blue for cool air, the more arrows the greater volume of air movement). This drawing shows "worse case" conditions such as when the telescope is brought from inside a warm house out into the cold night air. 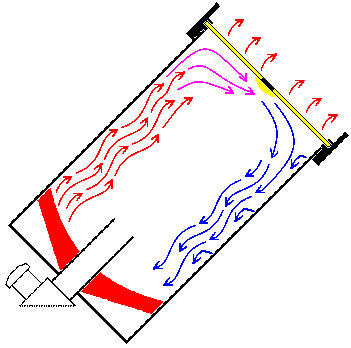
What is Radiation Cooling?
The laws of thermodynamics tell us that heat flows naturally from hot to cold objects. This means that the telescope (warm) gives up its heat to outer space (cold). A dew shield helps because it reduces the area of night sky that is robbing heat from the corrector plate. The telescope tube is also affected by radiation cooling because it has a large surface area exposed to the night sky and metal is very efficient at radiating heat (this is why metal objects dew up more quickly). While beneficial during telescope cooldown, it now works against us by cooling the telescope below the dew point and dew then forms. Why do conventional dew heaters cause problems?
Conventional dew heater systems do not adjust themselves for constantly changing conditions, but instead apply "worst case" power levels which prevent dew later in the night but result in too much power early on. Although they may be adjustable, you must still guess what level and users tend to apply excessive power. The drawing below illustrates this situation. 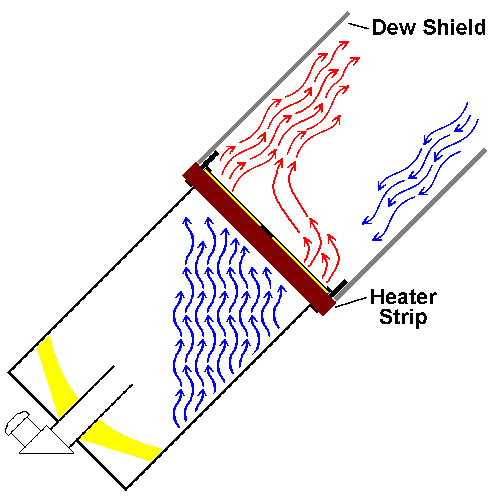
How does the DewBuster™ Controller prevent tube currents and overheating?
In the drawing below, we have a telescope fitted with a properly positioned heater strip being thermostatically controlled by a DewBuster™ Controller. The DewBuster™ Controller is not heating up the telescope, it applies just enough heat energy to replace what is lost to the night sky by radiation cooling and keep the telescope at the air temperature. 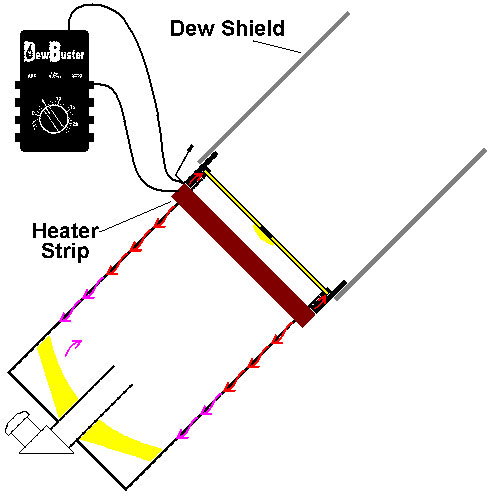

BATTERIES AND POWER SUPPLIES
How many Amps does the DewBuster™ Controller use?
The controller is basically a switch, it applies voltage to the heaters and the amount of energy (Amps) is depends on how many and what size heaters are plugged in. With no heaters plugged in the controller will draw less than 0.1 Amps. So check your heater manufacturer's web site for the Amps used by each of your heaters, then add them together to get the total Amps. If you can not find the specs on your heaters, you can use a multimeter to measure the Ohms (Ω) for each heater, then divide 12 Volts by the Ohms to get the Amps used by each heater. How many Amps can the DewBuster™ Controller handle?
Models with Heavy Duty Power Cord are limited to 14 Amps by the main fuse, Newtonian models with RCA jack power input have a 10 Amp main fuse, and Cigarette Plug models have an 8 Amp fuse in the tip of the plug. To prevent damage from shorted heaters, the short circuit protection limits each output channel (Left, Right, Medium Power) to 6 Amps each. Note that the Medium Power and two Temperature Controlled channels take turns pulsing their heaters, so under normal conditions only two of the three channels will be drawing current at any given instant and thus the average current is only 12 Amps. 
What's wrong with a cigarette plug?
A cigarette plug is best suited for only a few Amps, beyond that it starts getting warm because the plug can not handle the current. A good electrical connection has a quality known as "low-resistance" which keeps the connector from getting hot and delivers higher voltage at your heaters (important for large scopes). So if you find your cigarette plug gets hot after a while that means it can't handle the amount of current flowing through it. Another limitation of cigarette plugs is they use a conventional fuse which has resistance and this creates a voltage loss. DO NOT try to use a cigarette plug on 14" or larger SCT's because the voltage losses will result in low voltage at the big heater and it will not produce full power (if your power source only has a cigarette socket then it is probably not sufficient to power a 14" SCT anyway). What is the Heavy Duty Power Cord?
DewBuster™ Controllers with Heavy Duty Power Cords use large gauge #16 AWG wire and have an internal solid state 14 Amp "PTC" fuse. PTC fuses never need replacement, if tripped they will self-reset a few minutes after the fault clears. Another advantage is that a PTC fuse has extremely low resistance so more voltage reaches your heaters producing more heat at full power. The Heavy Duty Power Cord is available with a variety of connectors such as those shown below. 
What are Powerpole® connectors?
The Anderson Powerpole® is a premium connector widely used in Emergency Vehicles and Radio Controlled Aircraft where poor connections can be fatal. Powerpole® connectors are second to none when it comes to carrying large amounts of current with ultra-reliable low resistance connections. DewBuster™ Controllers use Powerpole® PP15 Silver connectors which are compatible with PP30 and PP45 connectors. All three have the same 55 Amp contact surfaces and differ only in the wire gauge they accept. What is a Powerpole® pigtail?
DewBuster™ Controllers with Powerpole® Power Cords can be used with just about any 12V battery or 13.8VDC power supply via a Powerpole® "Pigtail". The pigtail's Powerpole® connector plugs into the Powerpole® connector on the power cord. The other end of the pigtail has a connector to fit your power source (stripped&tinned leads, ring terminals, banana plugs, RCA plug, cigarette plug, etc.). For example, you could fit your 13.8VDC Power Supply with a pigtail for home use, and then fit several 12V batteries with pigtails so that you can swap batteries in seconds. You could even fit your battery charger with a Powerpole® connector to make charging batteries easy. Pigtails can be ordered after the controller by using the Accessories Order Form. For independent reviews of Powerpole® connectors read the Cloudy Nights Powerpole® article and the VARA Powerpole® article. 
Pigtails are available with the following connectors:
- Unassembled Powerpole® Connectors - You may order your DewBuster™ Controller with Powerpole® connectors so that you can fabricate your own power connections. One "Powerpole® Connector with 15A pins" consists of a red and black housing and 2 pins suitable for #16 wire.
- Cigarette Plug Pigtail - Cigarette Plugs are not "Heavy Duty" connectors but for small to medium sized scopes they will work fine. Because cigarette sockets can not handle large amounts of current, the Cigarette Plug has an 8 Amp glass fuse in its tip and thus it will blow before the 14 Amp PTC fuse inside the DewBuster™ Controller. If the fuse in the cigarette plug blows the LED on the cigarette plug will not illuminate.
- Ring Terminal Pigtail - Fits screw terminals and makes a solid connection that won't loosen by accident. Ring Terminal size is measured by the screw hole in the terminal and is available in 1/4", 5/16", and 3/8". Marine Batteries often use 3/8" Positive and 5/16" Negative terminals. PowerTank and many power supplies can accept 1/4" ring terminals if the red and black plastic nuts unscrew completely so that you can slip on the ring terminal (if the plastic nuts will not come off I can "spade" the ring terminals so they can slip onto the post). TIP: A thin coating of lithium grease on battery terminal connections will prevent corrosion.
- Banana Plug Pigtail - a universal connector that will fit the Pyramid and most other power supplies. A good choice for low-resistance high-current connections on large telescopes. Banana Plugs are designed to plug into Banana Jacks having holes approximately 5/32 inch I.D. and a depth of at least 1/2 inch. Many power units have "Binding Terminals" which have a hole in the center that can accept Banana Plugs.
- Stripped & Tinned Pigtail - Has stripped & tinned wires for connecting to your wiring. Marked for polarity.
- RCA Plug Pigtail - the same type plug used on heater strips. This plug can plug into the Power Distribution Panel on many Dob telescopes.
Should I use a battery or a power supply?
Batteries deteriorate so they must be replaced every few years. So if 120VAC power is available a good 13.8 VDC Power Supply is a better choice and can serve you for many years to come. If your 120VAC power source is unreliable then a 12V deep cycle battery can be used while it is connected to the charger, maintaining the battery at full charge while it is powering your DewBuster™ Controller. If 120 VAC is interrupted the battery will provide uninterrupted power. Why a 13.8V Power Supply instead of a 12V?
A 12V battery will measure 13.8 VDC when fully charged and your heater strips will only produce full heat at 13.8 VDC. The most common power source is a Linear Regulated 13.8VDC power supply. "Switching" type power supplies may also be used provided they can hande the current surges caused by the dew heaters being cycled on/off. Regardless of the type, get a power supply rated for at least twice the Amps your heaters will draw at full power. Do you offer a 5.5mm DC Plug for power input?
DC connectors are commonly used for telescope mounts, laptop computers, and other devices but they are not suitable for more than a few amps of current so I DO NOT recommend them for a dew controller of any type. However if you must connect your DewBuster™ Controller using a 5.5mm DC plug then contact me and I can build you a custom pigtail. You will also need to determine whether the center pin is 2.1mm or 2.5mm and verify whether the center pin is +. Can I connect the DewBuster™ Controller to the DC OUT connector on my telescope mount?
ABSOLUTELY NOT! The 2.1mm x 5mm DC power output connector on telescope mounts is ONLY for low current accessories and has small gauge wires that will burn up if you trying to connect any dew controller to it. This may permanently damage your telescope mount and void it's warranty. It is best to power your DewBuster™ Controller as close to the battery as possible. If you must use a cigarette socket splitter then connect it as close to your power source as possible. Note that many big Dob telescopes have a power distribution "rail" with multiple RCA jacks intended for powering accessories. Since these outputs are usually capable of carrying at least 5 Amps, it is OK to power the DewBuster™ Controller from the power distribution rail as long as the manufacturer does not recommend otherwise. How often should I recharge my battery?
Recharge your battery as soon as possible after each use. This offers the best chance for all of the lead sulphate to replate back onto the battery's lead plates. If left discharged the lead sulphate settles to the bottom as sludge and can't plate back when you try to recharge the battery so the battery will not store as much energy. I recommend leaving a "smart charger" connected to the battery at all times so that after it has recharged it will switch to "float" and maintain the battery at 13.6V to 13.8V so that it is ready for use when you need it. Conventional chargers should not be left connected all the time as they will overcharge and damage the battery. What size battery should I get?
First determine your Total Amps by adding together the Amps for each of your heaters (usually listed on your heater manufacturer's web site, if not the table below gives the typical Amps) and also add the Amps for any other items running off the battery (telescope mount, accessories). Then multiply Total Amps by the hours you wish to operate and this gives the minimum 12V battery size in Amp-Hours or AH. It is best to select a battery with at least double the Amp-Hours so you will not run the battery down completely every time. Extremely cold weather will also reduce battery capacity so factor that in as well. EXAMPLE: 8" SCT with 1.6A Corrector Plate heater and 0.2A Eyepiece heater will after 5 hours consume 9AH. So a 17 to 21AH battery would be a good choice. | Heater Size | | | Amps at Full Power |
| ----------------------------------- | | | ---------------------------- |
| 0.965" to 2" | | | 0.2 A |
| 3" to 4" | | | 0.8 A |
| Hand Controller | | | 0.8 A |
| Telrad | | | 1.0 A |
| 5" to 8" | | | 1.6 A |
| 9/10" | | | 2.0 A |
| 11" | | | 2.4 A |
| 12" | | | 2.8 A |
| 14/16" | | | 5.0 A |
When battery shopping, what numbers are important?
Buy only "deep-cycle" batteries because their thick lead plates can tolerate deep discharge without damage. Select a battery based on the amount of energy it can hold which is called Amp-Hours or AH. If a battery does not specify the AH then it is not a deep cycle but rather a "starting" battery. These have thin lead plates to produce plenty of Amps when starting a car but they can not tolerate deep discharge and will be damaged. To determine the AH needed, determine how many Amps will be used then multiply that by the number of hours you need to operate. For best results buy a battery with about twice the AH you need. Can I use a "Jump-Start" portable power unit as my battery pack?
These work well if they are of sufficient Amp-Hour (AH) capacity, but the AH rating is often difficult to find on the box, usually buried in the specifications. Most of the light weight units only have 7AH batteries which is quite small so look for a unit with 17 to 21 AH battery which is heavier but works well with small to medium sized telescopes. Are the amazingly small Li-Ion "Jump-Start" units okay to use?
Li-Ion "Jump Start" battery prices are dropping so they are becoming a viable option for powering your telescope. However the internal batteries are not 12V so the mAH ratings do not compare directly to 12V batteries so you will need to know the Watt-Hour (WH). If listed in milliWatt-Hour (mWH) divide by 1000 to convert to WH. Divide the WH by 12V to get the AH rating at 12V. So an 84Watt-Hour (WH) Li-Ion is equivalent to a 7AH 12V battery. Most of these units have "EC5" connectors for the 12V output so you'll need an EC5 to Cigarette Lighter adapter to power your DewBuster™ Controller. Do you recommend a PowerTank battery unit?
These contain the same Sealed Lead-Acid Battery as a Jump-Start unit, so unless the extra bells and whistles are important to you, just get a Jump-Start unit from a tool or automotive parts store for 1/3 the price. As with Jump-Start units, avoid the 7AH models and get one with a 17AH or larger battery. You may connect to your PowerTank's rear binding posts using 1/4" Ring Terminals. I have had reports that the binding posts are too small to accept standard Banana Plugs which require 5/32 inch I.D. holes at least 1/2 inch deep. Can I run the DewBuster™ Controller on 120 VAC power?
You can use a 13.8 VDC Power Supply to run on 120VAC house current. For your safety, be sure to power it through a GFI (Ground Fault Interrupter) to prevent electrical shock. These are available at any home supply store. Click here for more information about power supplies. Can I use an Inverter to generate 120 VAC from a battery so that I can plug everything into 120VAC just like I do at home?
You could, but every voltage conversion is only about 50% efficient. So going from 12V battery to 120 VAC and then back to 12 VDC will drain the battery 4 times faster which means you'll need a battery 4 times larger to do the same job. So power your 12V devices directly from you battery and only use the Inverter for devices that require 120VAC. Can I power my telescope from the DewBuster™ Controller's 12V Power Output jacks?
It will probably work on small telescopes, however you may have problems on large computerized telescopes because the voltage at the DewBuster™ Controller will dip each time the large heater cycles on and off which may cause erratic behavior of the telescope computer. The heavy duty power cord option helps reduce these voltage dips, but very large telescopes may still experience problems. Some computers are more tolerant of voltage dips than others, so if the computer misbehaves then connect the telescope power as close to the battery or power supply as possible so that it will not have to travel through the same power cord wires as the DewBuster™ Controller. Does the DewBuster™ Controller really save battery power?
Yes by not wasting power. After sunset the scope will cool slower than the air and the DewBuster™ Controller's temperature sensor allows it to reduce power to the heater and save energy. Later when the night sky starts sucking the heat out of your scope, the temperature sensor allows it to gradually increase power as needed to keep the telescope from cooling below the air temperature. Late at night when radiant cooling and dew are at their worst, the battery will have more energy left for the heaters and the DewBuster™ Controller will still be preventing dew while only using the minimum power needed to prevent dew. Can I still start my car when the low battery light comes on?
I do not suggest powering your dew controller or anything else from your car battery because car batteries are not designed for deep cycle use and will fail much sooner leaving you stranded. The answer to the question however is that the DewBuster™ Controller's low battery circuitry is intended to prevent battery damage, not to preserve any amount of energy for another purpose. How much time will my heaters operate after the Low Battery light comes on?
When the yellow "Low Battery" light illuminates, the DewBuster™ Controller is reducing heater power to prevent running the battery completely dead and damaging it. Depending on your battery size (AH) and the current drain of your heaters (Amps), you may get minutes or hours. When the "Low Battery" light begins to flicker you should consider disconnecting non-essential heaters. When the light remains on almost constantly you do not have much time left. The DewBuster™ Controller will not damage your battery even if it is left on for an extended period of time with the yellow light on, however other devices and anything plugged into the DewBuster™ Controller's 12V outputs should be disconnected or they may drain your battery completely and damage it. Can the low battery circuit be disabled when using a dedicated battery?
No. When a 12-Volt battery is drained below 10.5 Volts it will be permanently damaged, so this feature is always active on the DewBuster™ Controller. Also, heater strips produce less heat at lower voltage, so I do not recommend running your DewBuster on a power source of less then 10.5 Volts. What method does the DewBuster™ Controller use to regulate power to the heaters?
The DewBuster™ Controller uses Pulse Width Modulation (PWM) meaning full battery voltage is cycled on and off several times per second. The ratio of on time to off time is what determines how much heat is generated. If it is on 40% of the time then this would be 40% power level which generates 40% of the heat that would be produced if it were on all the time. Will the DewBuster™ Controller cause interfere with my camera equipment?
The DewBuster™ Controller is designed to minimizes EMF interference. I have had no reports of EMF problems and many users have reported that their DewBuster™ Controller eliminated any interference that their previous controller was causing. However, I have seen a few cases of "switching" power supplies emitting interference due to the DewBuster™ Controller switching the heaters on and off which caused the switching power supply to change its frequency and create RF noise that affected the camera images. This is easy to verify by turning the the DewBuster™ Controller off and if the problem disappears then try powering the the DewBuster™ Controller from a battery or linear power supply. If you experience problems I will work with you to resolve them and if you are not satisfied, your DewBuster™ Controller has a 30 day return policy (shipping is not refundable). Can I use a cigarette plug splitter?
It is best to avoid splitters in the power feed to the DewBuster™ Controller whenever possible. If you must use a splitter, get a heavy duty one rated for 10 amps or more as standard splitters are intended for low current applications like cell phone chargers. Before resorting to a splitter, check whether your power source has alternative connections. Many have terminals that allow connecting wires so you can cut the cigarette plug off of a heavy duty splitter and connect the wires directly to the terminals of the power supply. This eliminates having two cigarette connectors in series. Can you build a DewBuster™ Controller that operates on 24VDC?
No, because your heater strips would burn up. Applying 24V to a 12V heater creates 4 times the heat and the nichrome heating wire inside would glow red hot and melt the heater strip. So power your DewBuster™ Controller with a 12V battery or 13.8VDC Power Supply. 14" SCT's
Can the DewBuster™ Controller handle a 14" SCT?
Yes, the DewBuster™ Controller works well on a 14 and eliminates the need for a second controller. Efficiency is very important so be sure to place the heater strip around the aluminum tube just behind the corrector plate casting and use a dew shield. The heavy duty power cord is strongly recommended to reduce voltage losses and allow the heater to produce as much heat as possible when needed. Will the cigarette plug power cord work on a 14" SCT?
The big 14" heater requires very low resistance in all wiring and connections for it to produce full heat. DewBuster™ Controllers equipped with heavy duty power cords have a solid state PTC fuse and heavier gauge wire for low resistance and efficient current flow. This delivers full voltage to the heater allowing it to produce maximum heat. For best results I recommend a Heavy Duty Power Cord with Banana Plugs, Stripped&Tinned, Ring Terminals, or Powerpole® connector. Note that when a Cigarette Plug pigtail is used on the Heavy Duty Powerpole Cord, the cigarette plug will be the bottleneck as it is not a low resistance connector. If your DewBuster™ Controller has a cigarette plug power cord it can be sent in for an upgrade to the Heavy Duty Power Cord (see DewBuster™ Controller order form for prices and return shipping, then contact me for instructions). How can a DewBuster™ Controller keep my 14" SCT from dewing up if my old controller couldn't? Can it produce any more heat than other brands?
Small changes in battery voltage cause large changes in heat output (see chart below). Controllers with cigarette plug power cords will lose a great deal of energy in the cigarette plug (gets hot) and this is energy that is not being applied to the corrector plate heater. A DewBuster™ Controller equipped with the heavy duty power cord has heavier gauge wiring, a solid state PTC fuse, and low resistance connections which will not get hot when large currents are flowing. This means full battery voltage reaches your heater producing maximum heat with very little wasted energy. The DewBuster™ Controller also conserves battery power by using the temperature control to only apply heat when needed. This results in higher battery voltage later in the night when you need it the most. For maxim performance, be sure to place the heater strip properly and use a dew shield. Also consider wrapping the heater with insulation to reduce heat loss. How much does battery voltage affect heater wattage?
As shown in the graph below, a fully charged battery will produce almost twice as much heat as a discharged battery. Note that the heat generated depends on the actual voltage reaching the heater, not just the battery voltage. Because a cigarette plug power cord has resistance in both the glass fuse and the cigarette plug connections, the voltage at the heater will probably be about one volt less than battery voltage which translates into a 20% reduction in heat. A heavy duty power cord has much less resistance which means the heater voltage is much closer to the battery voltage and your heater will be able to produce more heat. 
Can a second heater strip be added?
The 14" heaters are marginal in heating capacity, so if the DewBuster™ Controller's Temperature Controlled heater LED remains on constantly this tells you the heater strip is not producing enough heat to warm the telescope to the desired temperature setting. Before adding a second heater, try to reduce heat loss by wrapping your heater with insulating material to improve its efficiency. A DewBuster™ Controller with banana jacks or ring terminals can handle the extra current for a second 14" heater (no need for a second sensor, just plug heater into second RCA output just below first heater). Since the DewBuster™ Controller monitors temperature, once temperature is reached it will reduce power so two heaters will use no more power than a single heater would. Why does my C-14 dew up even with a dew heater running at full power?
A 14" heater is barely able to keep up with the heat energy being lost to the night sky so insure your heater strip is placed in the most efficient position, around the aluminum tube just behind the corrector plate casting. It is also very important to use a dew shield as this will decrease the radiation cooling. You may also overlap the heater strip with insulation to help reduce heat escape so that most of the heat will enter your telescope where it is needed. Also make sure you have a robust battery or power supply because voltage plays a huge factor and as shown in the graph above. A fully charged battery or 13.8V power supply will generate 30% more heat than a 12V power source. If the power source can't supply enough current the voltage will drop each time the big heater turns on and that means it is not producing full heat. The heavy duty power cord also helps deliver full battery voltage to your heater. In contrast the cigarette plug power cord will lose about a volt which translates into 20% less heat. If after following the above recommendations you still experience dew, then check to see if the DewBuster™ Controller's LED remains on for the Temperature Controlled output driving the 14" heaters. If so, this means the heater is not warming the telescope up to the desired temperature. Try wrapping around the outside of the heater with insulating material to reduce heat loss. In some cases a second heater strip may be needed and this can be plugged into the second Temperature Controlled output (you do not need another temperature sensor since the first heater's sensor can control both). Together the two heaters will be able to warm the telescope up and once the desired temperature is reached the DewBuster™ Controller will automatically reduce power so that the pair of heaters uses no more power than a single heater would. NEWTONIAN TELESCOPES
What is the best way to prevent dew on a Newtonian primary mirror?
It is OK to heat the Newtonian secondary mirror, but the primary is a big chunk of glass that was of equal temperature throughout when it was ground. So unless the entire mirror is at the same temperature it will not obtain its ideal shape and concentrate starlight into pinpoint star images. Applying heat in any fashion will result in smeared stars and blurry planets. The good news is that cooling fans blowing air against the back of the primary mirror will not only cool a warm mirror to the air temperature, but after it reaches the air temperature it will prevent it from cooling any further and keep the mirror at an even temperature throughout. If your telescope is not equipped with a cooling fan, a temporary solution is to position a floor fan behind it so that it blows air against the back of the primary mirror. A shroud is also a necessity and when combined with the fans should adequately prevent dew. What if I don't need a temperature sensor?
The DewBuster™ Controller can be used without a Temperature Sensor in "manual mode". If no sensor is plugged into the sensor input jack, the Temperature Controlled outputs switch to Medium Power and operate at 40% duty cycle (40% heat) when the control knob is within the normal range (below 15). "Medium Power" provides enough heat to prevent dew in most cases. However extra power can be achieved by turning the control knob higher. As the control knob is increased above 15 the duty cycle of the Medium Power heaters gradually increases from 50% to 100% (full power). It will still utilize the Low Battery circuitry to prevent running your battery too low and damaging it. Which type temperature sensor should I use on a Schmidt-Newtonian telescope?
Schmidt-Newtonians have a corrector plate and use an SCT type heater strip so the SCT/Refractor sensor is used. Follow the same instructions as Schmidt-Cassegrains. Where is the best place to mount a DewBuster™ Controller on a Newtonian telescope?
The controller weighs about a pound, so on small Dobs if the controller is mounted near the eyepiece a counterweight may be required to maintain balance, however this may make the scope less balance-sensitive when changing eyepieces. On larger Dobs, mounting the controller on the upper cage reduces the need to run heater cables down the truss tubes and the optional RCA Power Jacks can power accessories such as the AstroSystems DewGuard. A Special "Big Dob" DewBuster™ Controller is available with options that many large Dob owners may find useful. Why does my primary mirror stay dew free all night yet it dews up in the morning ?
Large Dobs may experience condensation when the morning sun rapidly warms the air and then moisture condenses onto the primary mirror which is still cold from the night before. The most efficient way to prevent morning condensation is by keeping the moist morning air from reaching the cold mirror until the mirror has warmed up to daytime temperatures. You may have success using the mirror cover over the front and a plastic bag over the back of the mirror box. Can the DewBuster™ Controller be used on a Newtonian telescope?
Yes but you should avoid heating the primary mirror as explained above. The secondary mirror will often dew up because it is closer to the open end of the tube so the shroud is not an effective dew shield for it. The secondary mirror is also a much thinner glass and mounted in an aluminum housing which robs the mirror's heat and radiates it to the night sky. If the only component you need to heat is the secondary mirror then the AstroSystems Dew Guard my be the easiest solution. If you have a stalk mounted secondary mirror or if you need to heat other components, then the DewBuster™ Controller may be used with a Newtonian Temperature Sensor to control a heater attached to the back side of the secondary mirror or stalk. The Newtonian Temperature Sensor may be substituted for the standard sensor when ordering your DewBuster™ Controller or it may be purchased later using the Accessories Order Form. What is the BDDB "Big Dob" DewBuster™ Controller?
The Big-Dob DewBuster™ Controller (BDDB) is a special version intended for large Dobs equipped with a wiring harness having a male RCA plug to mate with the BDDB's female RCA power input jack. Click here for more information.